Missa Paratha (Kala Chana Paratha Roti)
Equipment
Ingredients
- ½ cup black gram flour Kala chana
- ⅓ cup whole wheat flour roti ka atta, use as needed
- ½ inch ginger chopped
- 1 green chili chopped adjust to taste
- ½ tsp salt
- ⅛ tsp asafetida hing
- ½ tsp cumin seeds jeera
- 3 tbsp oil for cooking
Instructions
- Soak chana for about 4 hours. Grind the chana with ginger and green chili to the paste using water as little possible. I used about 1/2 cup of water.
- Mix all the ingredients for paratha together, whole wheat flour, cumin seeds, salt, and asafetida.
- Make the dough mixing everything together if needed add more flour, knead the dough. Oil your both palm and roll the dough between your palms.
- Dived the dough into 6 equal parts, oil your palm and roll them between your palms, to make them round petties.
- Roll dough ball into a 3” circle. Spread about 2 drops of oil and pull the edges of the dough to wrap. Repeat to make all six balls.
- Roll the patty in dry whole-wheat flour. Press it a little and start rolling on a clean surface to about 6 inches in diameter.
- Place the Paratha over the skillet. When you see the color change and the paratha will puff in different places. Turn the paratha over.
- The paratha should have golden-brown spots. Wait a few seconds and put about 1 teaspoon of oil and spread with a spatula.
- Flip it again and lightly press it with a spatula. Flip again and press with the spatula making sure the paratha is golden-brown on both sides.
- Repeat same process for the remaining.
Notes
How To Make Missa Parantha Recipe – Manjula’s Kitchen
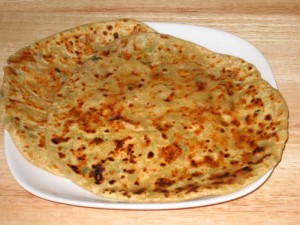
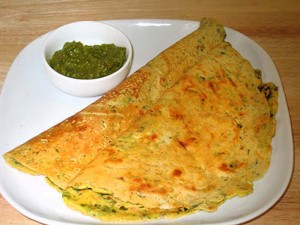
Missa paratha is a traditional flatbread from North India. It’s made with wheat flour, spices, and leftover yellow dal tadka. Missa paratha is often confused with besan ka paratha, but the two are different. Missa atta (flour) is made from whole gram with the skin on, while besan is made from split gram without skin. Preparing Missa Paratha is a delightful process that involves a few simple steps. Let’s break it down in detail:
Step 1: Soaking the Chana
To begin, soak the chana (chickpeas) for about 4 hours. This soaking step is important as it softens the chana, making it easier to turn into a paste later on. Patience is key here, as giving the chana enough time to soak will make the entire process smoother. So, just let them soak and you’re on your way to making a fantastic dish!
Step 2: Grinding the Chana Paste
Once your chickpeas have soaked, grind them up with ginger and green chili. The key is to make a smooth paste, and try to use as little water as you can – about half a cup should do the trick. Grinding it all together will give your dish a tasty and smooth texture.
Step 3: Mixing Missa Parantha Ingredients
Alright, let’s get into making the delicious Missa Paratha. First, gather the simple ingredients: whole wheat flour, cumin seeds, salt, and a dash of asafetida. Now, mix them all up to create the foundation for your tasty Missa Paratha.
Step 4: Creating the Dough
Combine the mixed ingredients to make the dough. If necessary, add more flour to achieve the right consistency. Knead the dough thoroughly to ensure a uniform texture. To prevent sticking, oil your palms before rolling the dough between them.
Step 5: Dividing and Shaping Dough
Now, take the dough you’ve prepared and split it into 6 equal parts. To make things easier, put a bit of oil on your palms – it helps! With your oiled hands, roll each part between your palms, shaping them into round patties. This simple step ensures that all your portions are the same size, making the next part, where you roll them out, much simpler. So, oil up your hands, divide the dough, and roll those parts into neat, round patties – it’s the key to uniform and manageable dough balls!
Step 6: Rolling the Paratha
To shape each dough ball into a peda, start by rolling it into a circle about 3 inches in diameter. For an extra burst of flavor and a delightful texture, gently spread about 2 drops of oil onto the dough. Now, carefully pull the edges of the dough towards the center, wrapping it neatly to form a round peda. Repeat this process for all six dough balls, ensuring each one gets the same delicious treatment. This simple yet crucial step adds a lovely touch to your pedas, making them even more irresistible. Enjoy the process of crafting these delightful treats!
Step 7: Coating in Flour and Rolling Further
Roll each patty in dry whole-wheat flour. Press it lightly and start rolling on a clean surface until it reaches approximately 6 inches in diameter. This step adds a thin layer and enhances the texture of your Missa Paratha.
Step 8: Cooking on Skillet
Now, it’s time to cook. Place the paratha on a hot skillet. Watch for a change in color and puffiness in different places. When you observe these signs, it’s time to flip the paratha over. The aim is to achieve golden-brown spots on both sides.
Step 9: Adding Oil and Pressing
Once flipped, wait a few seconds, then add about 1 teaspoon of oil. Spread it evenly with a spatula. Flip it again and lightly press it with the spatula. The goal here is to ensure that the Missa Paratha is golden-brown on both sides. This process adds flavor and a delightful crispiness to your Missa Paratha.
Step 10: Repeat the Process
Keep the momentum going by repeating the same process for the rest of your dough balls. This step is crucial for maintaining a consistent flavor and texture in all your Missa Parathas. Just follow the same easy steps you did for the first batch – roll out the dough, add the delicious filling, and cook them up to perfection. This ensures that each parantha on your plate is as tasty and delightful as the last one, giving you a uniform and satisfying dining experience. So, keep at it, and soon you’ll have a batch of wonderfully consistent Missa Paranthas ready to be enjoyed!
In conclusion, making Missa Paratha involves a series of straightforward yet crucial steps, from soaking and grinding the chana to crafting the perfect dough and achieving that golden-brown finish on the skillet. It’s a process that rewards attention to detail and patience, resulting in a delicious and satisfying Indian flat bread. Enjoy your homemade Missa Parathas!
You might also like: Punjabi Aloo Paratha, Sooji Ka Halwa, Salted Mint Lassi, Mixed Dal


Beautiful paratha.