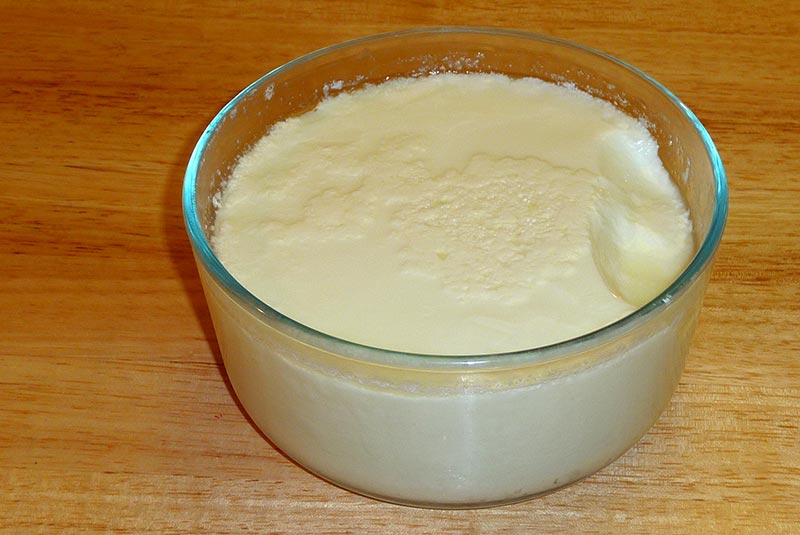
Homemade Yogurt tastes delicious and is very refreshing. Yogurt is high in protein and calcium. It is easy to make, you only need milk and the right culture / starter.
Boil the milk and let it cool down to 110 to 120 degree. You can use a candy thermometer to check the temperature, if the milk gets too hot it kills the bacteria in the culture.
After milk cools down pour the milk into a bowl that you want to make the yogurt in.
Add 2 tablespoons of yogurt from previously home made yogurt or use the dry yogurt starter. Package will tell you how much dry starter to use. Don’t follow the other directions from the dry starter package. Mix the yogurt with milk by stirring gently.
Cover the bowl with a light blanket or folded sheet, and keep it in warm place for about 4 hours.
After yogurt is set, refrigerate for at least an hour before using.
Notes
TipsIf you prefer more creamy mix ¼ cup of half & half milk or boil the full milk for about 5 minutes longer to reduce the milk in volume to give more creamy texture to the yogurt.I have tried using starters from many store bought yogurt including organic or Greek yogurt, and they don’t work. I think because store bought yogurt has many artificial additives.Store bought yogurt is more firm because of the pectin.Yogurt can be made using 1%, 2% or full milk and full milk yogurt will have more body to it.There are two ways to make yogurt creamier. 1) With 3 cups of milk use 1 cup of half & half milk OR 2) boil the full milk for about 5 minutes longer to reduce the milk in volume to give more creamy texture to the yogurt.
Yogurt Chutney is great paired with dosas and pudas. It is a great and less time-consuming variation from the more commonly used chutneys, such as coconut chutney.
Cauliflower in spiced yogurtgravy makes a very flavorful side dish. This dish is simply delicious and worth trying. You can serve this with any bread or rice.
3 cupcauliflower cut into small florets (phool gobi)
3 tbspoil
1/2tbspcumin seeds (jeera)
1/4tbspfenugreek seeds (methi dana)
1/4tbspmustard seeds (rai)
1/8tbsp asafetida (hing)
2tbspbesan, available in Indian grocery stores
1/4tbspturmeric (haldi)
1/4tbspred chili powder
1 tbspginger thinly sliced (adrak)
1 green chili finely chopped
1/2cup yogurt (curd, dahi)
1tbsp salt
1/2tbsp sugar
Approx. 1cup water
2tbspcilantro chopped (hara dhania)
1/4tbspgaram masala, available in Indian grocery stores
Instructions
Heat the oil in a saucepan over medium high heat. Test the heat by adding one cumin seed to the oil. If the cumin seed cracks right away, the oil is ready.
Add cumin, fenugreek, mustard seeds, and asafetida. When the seeds crack, lower the heat to low.
Add the besan, stir fry for about one minute until besan becomes light golden brown and becomes lightly aromatic.
Add ginger, green chili, turmeric, red chili powder, stir fry for about one minute and add yogurt mix it well and cook for two minutes stirring continuously.
Add water and salt bring it to boil, add cauliflower cook 15-18 minutes, stirring occasionally. Cauliflower should be tender and the gravy should be thick. Adjust the thickness of the gravy to taste.
Turn off the heat, add cilantro and garam masala and cover the pan for a minute.
Cauliflower with yogurt gravy is ready. Serve with any bread or plain rice.
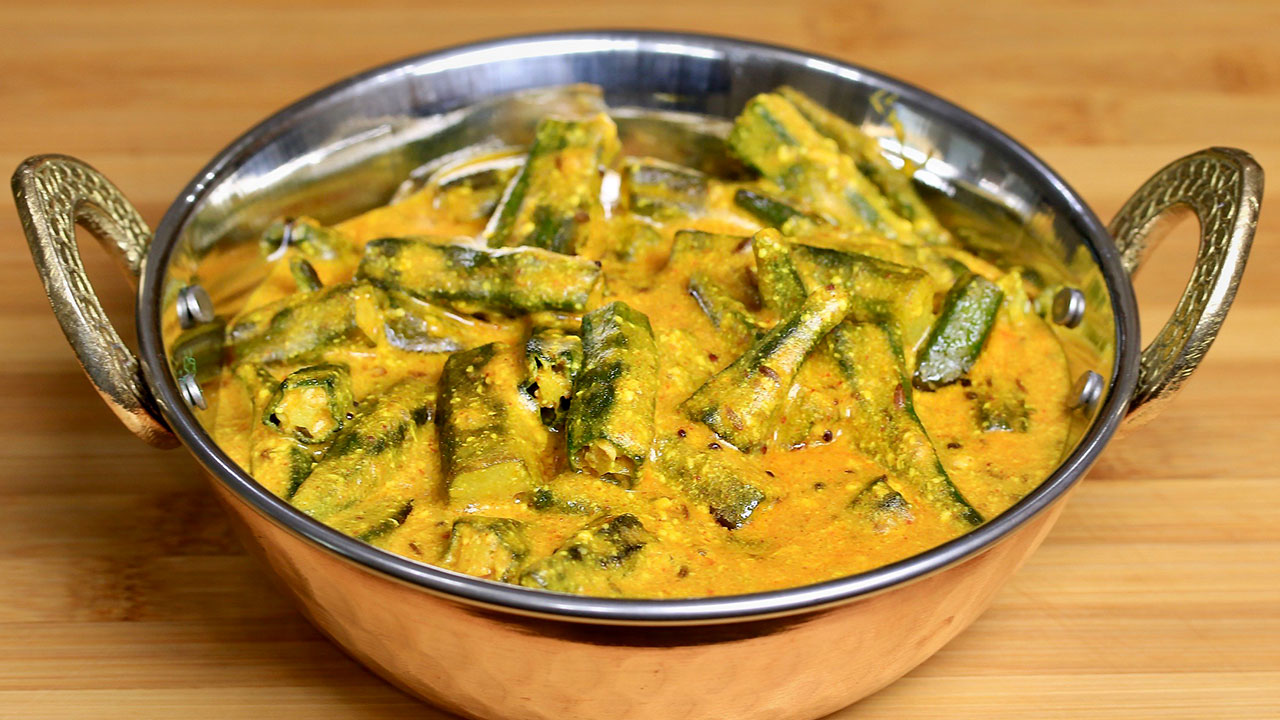
Dahi Bhindi is a great way to enjoy okra in tangy creamy sauce. Dahi Bhindi is simply delicious, and easy to make. This goes well with Jeera (Cumin) Rice, or roti-paratha.
40medium size okra (bhindi)after cutting them in half it should be about 2 cups.
3Tbspoilcanola or vegetable oil
1/2tspcumin seedsjeera
1/4tspmustard seedsrai
1/8tspasafetidahing
1Tbspbesangram flour
2tspcoriander powderdhania
1tspRed Chili Powder
1/4tspTurmeric Powder
1cupyogurtdahi, curd
1cupwaterapproximately
1/2tspsalt
Instructions
Wash and pat dry the okra cut both ends, and cut them into about 1-inch pieces. I have used about 35 medium size okra after cutting, they are about 2 cups.
Heat 2 tablespoons of oil in a frying pan over medium heat and stir fry the okra till they are tender. This should take about 7-8 minutes.
Take them out in a bowl and use the same pan for making gravy.
Heat 1 tablespoon of oil, over medium heat. After the oil is moderately hot add the cumin seeds, mustard seeds and asafetida as the seeds crack, turn down the heat to low.
Add the besan and stir fry for about 1 minute until it has a light aroma, and is golden brown in color. Besan gives the thickness to gravy.
Add yogurt, turmeric, chili powder and coriander powder. Mix it well. And cook until the spice mix comes together, and you should be able to see the oil leaving the sides of spice mix. This should take about 2-3 minutes.
Spice mix is ready add about 1/2 cup of water and salt, bring it to boil. Add okra and let it cook for 3-4 minutes, on low heat.
Suggestions: You can make so many different dishes using this gravy. Instead of okra use potatoes, paneer, green peas, mixed vegetables, or any vegetable you have.
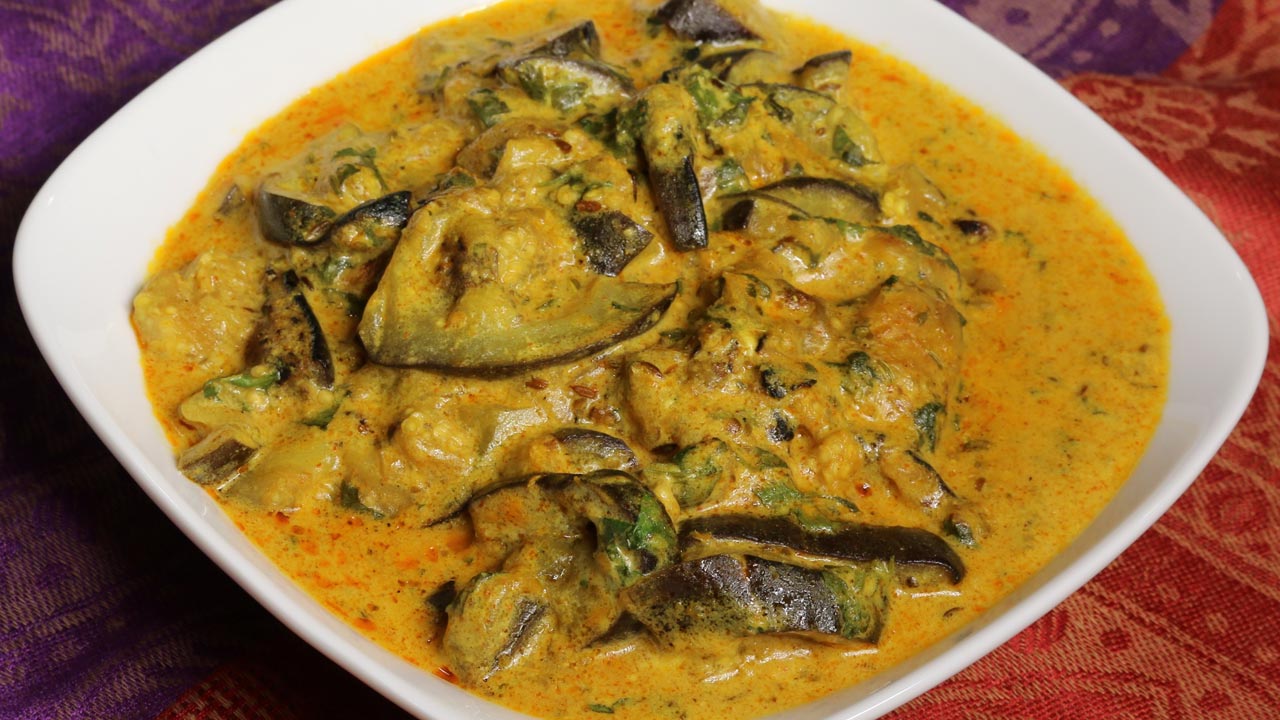
Dahi baingan (Sautéed Eggplant with Yogurt is a classic eggplant dish. This recipe is very sophisticated but very simple to make. It is always amazing to see how a few simple ingredients can make such a satisfying dish. My husband who doesn't like eggplant fell in love with this dish. Dahi Baingan is simply delicious. This can be served with plain rice or roti.
1 eggplant cut into ¼ inch thick pieces this will make about 4 cups of cubed eggplant (baingan, brinjals)
3 tablespoons oil
1/2teaspoon cumin seeds (jeera)
1/8teaspoon asafetida (hing)
1teaspoon ginger thinly sliced
1 teaspoon salt adjust to taste
1cup yogurt
2teaspoons gram flour (besan)
2 teaspoons coriander powder (dhania)
1 teaspoon fennel seeds crushed (saunf)
1teaspoon red chili powder, adjust to taste
1/8teaspoon turmeric (haldi)
About 1/4cup cilantro chopped
Instructions
Whisk the yogurt besan, and cilantro together keep aside.
Heat the oil in a flat pan on medium high heat. When oil is moderately hot add cumin seeds as seeds crack add asafetida, ginger. Stir for about half a minute.
Add eggplant stir gently, spread them in the pan evenly. Sprinkle the salt over eggplant, do not mix. Cover the pan, lower the heat to medium low and let it cook for about 2-3 minutes.
Turn them over, some of the eggplants will have grilled charcoal color. Cover the pan and let it cook for another 2-3 minutes.
Check the eggplant they should be soft and tender add the remaining spices coriander, fennel seeds, and turmeric. Stir gently all the pieces of eggplants should be coated with spice mix. Add yogurt stir gently and let it cook for 2-3 minutes.
Notes
Notes: Adding the besan to the yogurt is essential as it prevents curdling the yogurt. Also give the thickness to the gravy.
This orange flavored mousse is light, creamy and fluffy dessert. Orange flavor is infused into the mousse by using orange juice, zest and marmalade. The crust is made with crushed ginger snaps spiced with a pinch of cayenne pepper. The mousse is served with an orange-dark chocolate sauce. It is a nice sweet snack that is prepared to its perfection.
Add ginger snaps, unsalted butter and cayenne pepper in a food processor. Pulse for 20 seconds mix and pulse for 15 seconds.
Line a 6×6 pyrex glass bowl with parchment paper. Place the ginger snaps mixture onto the lined bowl. You can use a similar sized pan or individual molds as well.
Place the bowl in a preheated oven and bake for 8 minutes on the middle rack. Take it out of the oven and let it cool down.
For Mousse layer
Whisk the yogurt, add the orange marmalade and mix well. The mixture will be smooth.
Whip the heavy cream in a bowl by using an electric mixture or a whisk until peaks form.
Add powdered sugar to the orange zest and let it rest for 5 minutes. Add the zest to the yogurt mixture and mix well.
Boil the orange juice and reduce it by half. Add agar agar powder to the juice and mix, simmer for 5 minutes for the agar agar powder to completely dissolve in the juice. Let the mixture cool down but make sure it doesn’t start to solidify.
Add the agar agar powder-orange juice mixture to the yogurt mixture and mix well.
Lightly fold in the yogurt mixture into the whipped cream with a spatula.
Pour the mousse mixture over the cooled ginger snaps layer and place it in refrigerator for at least 4 hours.
For Sauce
Pour the heavy cream into a saucepan and bring to boil. Reduce heat, add orange zest and let it simmer for 5 minutes. Remove from heat and let it steep for 20 minutes. Add orange marmalade.
Take the bittersweet chocolate chips in glass bowl.
After 20 minutes bring the cream mixture to boil over medium heat and then remove from heat.
Add the cream mixture slowly to the bittersweet chocolate chips and whisk, until the chocolate is completely melted. Mix in the sea salt.
To serve, cut a slice of the chilled orange-yogurt mousse, drizzle the orange flavor infused dark chocolate sauce over the slice of mousse. Garnish with orange slice and mint leaf.
Put the yogurt in a strainer lined with muslin or cheese cloth. Gently squeeze excess water from the yogurt. Make sure not to squeeze out the yogurt, and leave it at least 4 hours or more. Before removing the yogurt from muslin cloth squeeze one more time.
The yogurt will become thick in consistency, this is known hung yogurt, and this should make about half cup.
Add all the ingredients for filling with yogurt and mix it well.
Spread the mix over two slices of bread and cover them with other slice.
Heat the skillet over medium heat; grease the skillet with about half teaspoon of butter.
Sprinkle the skillet with mustard seeds as seeds crack place the sandwich over, brush the butter on top of the slice. Grill the sandwich from both sides until they are golden brown. This should take about one minute each side.
Sandwiches are ready; serve them with side of salad
Yogurt sandwiches taste great even at room temperature, and great for lunch box.
1/4cup split moong dal (washed) available at Indian grocery store
3 cups of water
1tablespoon oil
1-1/2 teaspoons salt
1 cup yogurt (curd or dahi)
1/4 cup shredded cucumber (kheera)
1/4cup shredded carrots (gajar)
1 tablespoon finely chopped ginger (adrak)
For Seasoning
2tablespoons oil
1/2teaspoon mustard seeds (rai)
1/2 teaspoon cumin seeds (jeera)
2 whole red peppers
1tablespoon finely chopped green pepper, adjust to taste
8-10 curry leaves available at Indian grocery store, optional
2tablespoons chopped cilantro (hara dhania)
Instructions
Wash rice and moong dal changing water several times until the water appears clear.
Drain the rice and moong dal and put it into the saucepan. Add water, oil, ginger, and salt, and bring to a boil over high heat.
Once the water is boiling reduce the heat to low, do not cover the pan. Cook for 10-12 minutes rice and dal will be soft cover the pan and cook for about 15 minutes, or until the rice is very soft and mushy.
Mix the rice and dal whipping making them mushy; if rice is dry add little more hot water as needed. Mix should be consistency of portage.
Let the rice cool down to room temperature, add the yogurt and mix it well. Adding the yogurt to hot rice will make yogurt sour and watery. Next add cucumber, carrot and ginger and mix.
Prepare the seasoning: In a small sauce pan heat the oil over medium high heat. Add the mustard seeds and cumin seeds as seeds crack add red pepper, green chili, curry leaves and cilantro stir for about a minute. As you will add curry leaves oil will splatter, so be careful.
Turn off the heat and mix the seasoning with rice mix. Yogurt Rice is ready to serve.
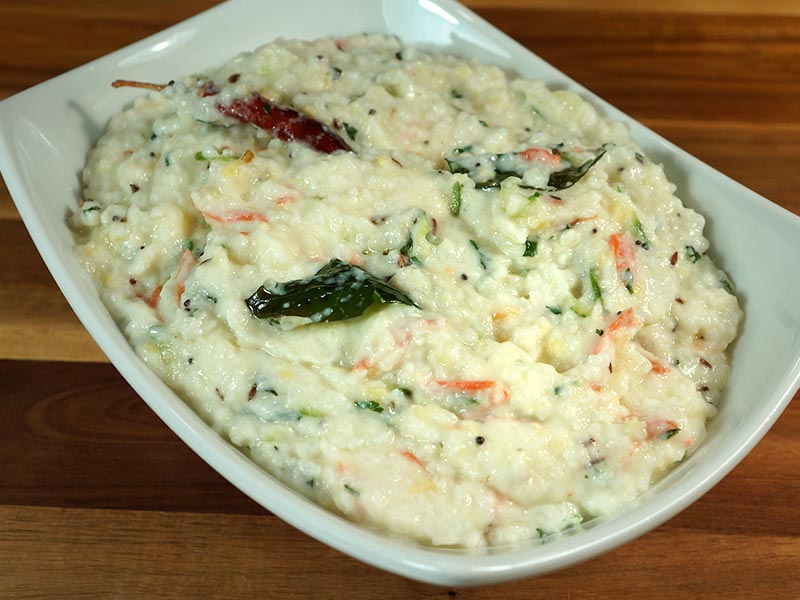
Curd rice, also known as yogurt rice, is a popular gluten free South Indian dish made by mixing cooked rice with yogurt (curd). It is typically served as a main dish or as part of a meal, especially during hot summers, as it is cool and soothing to the palate. To prepare curd rice is quick & easy , cooked rice is mixed with fresh yogurt and seasoned with ingredients such as mustard seeds, curry leaves, green chilies, ginger, and sometimes grated vegetables like carrots or cucumber. Curd rice is known for its creamy texture, tangy flavor from the yogurt, and refreshing taste, making it a comforting and satisfying dish.
Preparing Curd Rice: Soaking and Draining the Rice
To begin the recipe curd rice, start by ensuring the rice is clean and ready for cooking. Wash the rice thoroughly and then soak it in about 3 cups of water for at least 15 minutes. This soaking process helps to soften the rice grains, ensuring a creamy texture once cooked. After soaking, drain the water and set the rice aside, ready to be transformed into a delightful dish of curd rice.
Tempering and Stir-Frying: Infusing Flavor into Curd Rice
In a saucepan heated over medium heat, add oil and mustard seeds. Allow the mustard seeds to crackle, releasing their aromatic essence into the oil. Once the seeds crackle, add peanuts to the pan and stir-fry for about a minute until they turn lightly golden brown. This step adds a delightful crunch and nutty flavor to the curd rice, enhancing its overall taste and texture.
Cooking the Rice Mixture: Blending Ingredients for Curd Rice
To create the base for your curd rice, add chopped tomatoes, green chili, turmeric, sambar powder, salt, and cilantro to the saucepan. Cook the mixture until the tomatoes are tender, which typically takes about 2 minutes. These flavorful ingredients infuse the rice with deliciousness, setting the stage for a delectable dish of curd rice.
Simmering and Finalizing: Perfecting the Curd Rice
Once the tomato mixture is cooked, add the soaked and drained rice along with 2 cups of water to the saucepan. Mix everything well and bring it to a boil. Then, lower the heat to low, cover the pan, and let the rice cook for about 18-20 minutes, or until the rice is soft and the water has evaporated. After cooking, gently stir the rice and add the remaining tomatoes, stirring them in gently. Cover the pan once again and let it cook for an additional 2 minutes to ensure all the flavors meld together perfectly.
Serving Curd Rice: Enjoying the Creamy Delight
Once the curd rice is cooked to perfection, it’s time to serve and savor this creamy delight. Serve the curd rice either on its own or accompanied by yogurt for a refreshing and satisfying meal. Whether enjoyed as a main dish or a side, curd rice is sure to delight your taste buds with its creamy texture and flavorful ingredients.
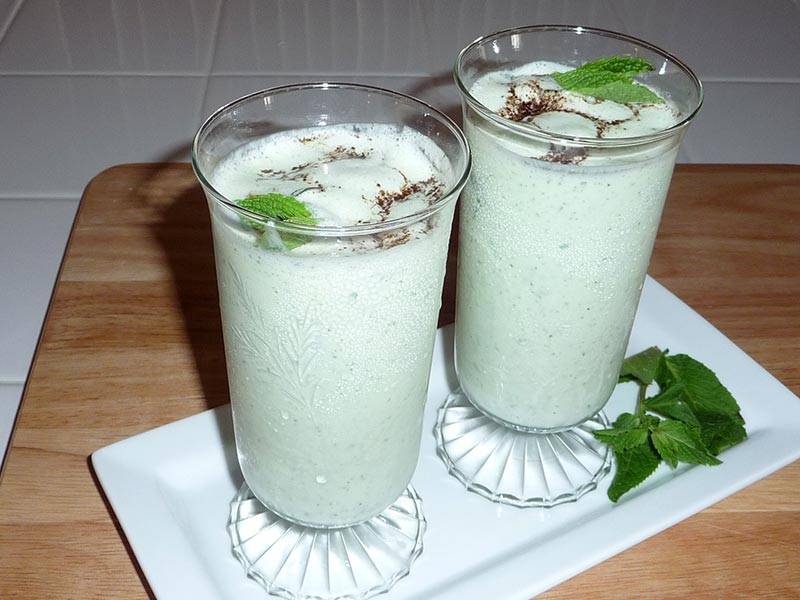
Lassi is a healthfulyogurt-based drink, popular throughout India. Mint and ginger give it a tangy and refreshing taste. Mint Lassi is a great compliment to any meal, especially during summer.
Blend mint leaves with two tablespoons of yogurt to make a paste. Add yogurt, ginger juice, salt, black salt, and one cup of water. Blend just enough to make the drink smooth; don’t over-blend as it will froth.
Pour it over ice cubes and garnish with roasted cumin seed powder and mint leave.
Lassi can be made one day in advance and refrigerated.
Notes
*Note:
Making Ginger juice: shred the ginger using a fine grater or zester and squeeze the pulp using fingers.
Roasting Cumin seeds: Toast cumin in a heavy skillet over medium heat, stirring frequently, until aromatic and brown in color. You can make a small jar of this in advance and keep it for couple of months. This is used in many recipes.
A healthy bean salad with an Indian twist is something that can bring you accolades at a party. This high-protein-packed salad brings with it the goodness of fresh and colorful veggies. Couscous adds to the fiber content of the salad while the minty yogurt gives it an Indian touch and that extra zing!, keeping the calories under count too. At times this can also serve a full meal on its own! The veggies for this salad are chosen such that you can make this salad ahead of time ( to lessen that last-minute hush) and it will not turn soggy/watery or have that oniony smell. What more can you ask from a simple salad recipe!
1 cup Kidney Beans (I used a mix of the dark and light variety)
1 cup finely cut veggies: red, green and yellow capsicum, boiled corn kernels, celery.
1/4 – 1/2 Cup couscous (as per your choice)
Lemon juice – to taste
For the Dressing:
1 Cup yogurt (I used Greek style Yoghurt)
1 Cup fresh mint leaves
Handful of fresh coriander leaves
Chopped tomato – half
Garlic cloves and ginger – to taste (optional)
Chaat masala, salt, black salt, red chili powder, black pepper powder, green mango powder, anardana powder – To taste.
For Garnishing and serving:
Fresh Coriander and mint leaves
Lettuce leaves
Some chopped capsicum, boiled corn etc.
Instructions
Method
Wash and soak kidney beans overnight in sufficient water. Pressure cook or boil them till cooked. The beans should retain the shape and should be well cooked. Set aside for cooling.
Wash and drain cous cous properly. Add enough warm water to soak it and leave aside for 10-15 minutes.
Grind together mint leaves, coriander, and garlic, ginger, chopped tomato, all spices for the dressing. You can add green chilies if you like your salad hot.
Mix the above with hung yoghurt. Make sure the yoghurt is thick as we do not want the salad to turn watery.
In a big bowl, add the boiled beans (just press them little so that they open up a bit; this will help the dressing seep into the beans and impart them some flavor but make sure they still retain their shape). Now add cut vegetables and the minty yoghurt dressing and well.
Fork through the cous cous so that the grains separate. Add this to the salad bowl and give it a good mix. Finally add some lemon juice and mix. Do a taste test and adjust salt if needed.
For an eye catching presentation, serve a portion each on Lettuce leaves such that the leaf serves as a plate as well for individual serving! Sprinkle some cut veggies and mint and cilantro leaves!
Notes
Variations and tips:
If you have mint chutney on your menu with some starter, this salad is a must! Just mix green chutney and yogurt, throw in some more spices and Voila! You have the dressing ready in a jiffy.
Although capsicum and celery are enough to give a crunch, but still if you really do want to have onions, add them just before serving. It will look fresh as well as avoid that smell. Tomatoes are also grinded and not added directly as they tend to release water and the salad can’t be made ahead of time.
This can be made with only coriander if mint is not at hand. But adding mint makes it unique and so very flavorful! Try using dried mint instead but you will lose on the flavor.
Yogurt should not have extra water; else the salad will go runny.
Instead of yogurt, you can make a simple cream/sour cream dressing as well but that adds to the calorie count too!
You can use sprouted moong, moth instead of kidney beans but it tastes great with kidney beans; you will have to take my word for that.
You can use dried herbs as well like oregano, parsley or herb mixture of your choice. Options are endless!
Serving Options:
Serve it as a starter with corn chips.
It goes very well with Rice/Biryani or even bread or chapattis for that matter.
Use it as a noteworthy addition to your next scrumptious party menu.
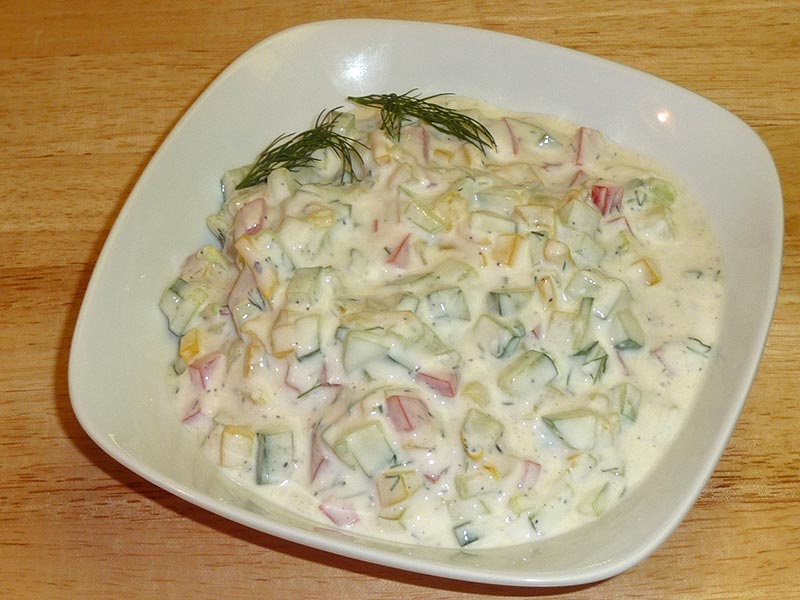
Indian meals are not complete unless the meal includes a yogurt dish such as a Vegetable Raita. This is a colorful raita and can brighten up any meal. Serving for 4.
Learn How to make Vegetable Raita by Manjula’s Kitchen
What is Vegetable Raita: Raita is an accompaniment for any Indian meal and can be created in the form of Vegetable Raita, Spinach Raita, Boondi ka Raita, Cucumber Raita & Lauki ka Raita. Here we are focussing on making vegetable raita, it is a simple quick & easy, gluten free, kid friendly and nutritious yogurt-based recipe featuring vegetables and a selection of Indian spice powders. In the realm of culinary exploration, the creation of a delectable mix vegetable raita stands as a testament to the artistry that can be achieved with a few simple ingredients. This versatile dish, known for its refreshing taste and vibrant medley of flavours, offers a delightful twist to traditional raita recipes. Let’s embark on a culinary journey, unravelling the intricacies of crafting a mix vegetable raita that captivates the palate.
Mixing the Yogurt Base:
The journey begins with the heart of the mix vegetable raita—yogurt. A foundational step involves thoroughly mixing the yogurt to create a smooth and creamy base. If the yogurt happens to be thick, akin to pudding, a strategic addition of milk is introduced to attain the desired consistency reminiscent of a yogurt drink. This meticulous process sets the stage for the infusion of various flavours that will transform the humble yogurt into a culinary delight.
Seasoning the Base:
To elevate the taste profile, a symphony of seasonings is introduced. Salt, chopped dill, black pepper, roasted cumin seeds, and paprika come together in perfect harmony, each contributing its distinct note to the mix vegetable raita. This amalgamation not only imparts a depth of flavour but also showcases the versatility of the dish, making it a fitting accompaniment to various culinary creations.
Balancing Flavours:
A key consideration in perfecting the mix vegetable raita is achieving a harmonious balance of flavours. If the yogurt tends towards sourness, a touch of sugar is introduced, striking the perfect equilibrium between sweetness and tanginess. This thoughtful addition ensures that every spoonful of the raita delivers a well-rounded and satisfying taste experience.
Infusing Freshness with Vegetables:
The introduction of chopped cucumber, tomatoes, and yellow bell pepper adds a burst of freshness and colour to the mix vegetable raita. These crisp and vibrant vegetables not only enhance the visual appeal but also contribute a delightful crunch, transforming the raita into a sensory delight. The careful selection and preparation of vegetables elevate the dish from a simple condiment to a standalone culinary creation.
Variations and Personalization:
The beauty of mix vegetable raita lies in its adaptability. Variations abound, allowing for creative culinary expressions. Dill, a traditional choice, can be replaced with chopped mint or cilantro, offering a different herbal note to the ensemble. The vegetable composition can also be tailored to individual taste preferences, making the mix vegetable raita a versatile canvas for culinary innovation.
Expert Tips for Culinary Success:
No culinary journey is complete without a few expert tips. To enhance the flavour profile, dry roasting cumin seeds is recommended. This process is performed on medium heat until the seeds turn brown, releasing the distinctive aroma of cumin. Post-roasting, grinding the cumin seeds, once cooled to room temperature, ensures that the spice is evenly distributed throughout the mix vegetable raita, intensifying the overall taste experience.
Conclusion: A Culinary Symphony Unveiled
In conclusion, the process of creating a mix vegetable raita is not just a culinary endeavour; it’s a symphony of flavours, textures, and creativity. From the careful mixing of the yogurt base to the strategic addition of seasonings and the infusion of fresh vegetables, each step contributes to the creation of a culinary masterpiece. The variations and personalised touches open the door to endless possibilities, allowing individuals to tailor the mix vegetable raita to their unique taste preferences.
As we navigate the intricacies of the mix vegetable raita recipe, it becomes apparent that this dish is not merely a side accompaniment but a culinary journey that showcases the art of harmonising diverse elements. It is an invitation to explore, experiment, and savour the richness of flavours that unfold with every bite. The mix vegetable raita, with its vibrant medley and thoughtful nuances, stands as a testament to the creative potential within the realm of culinary arts.
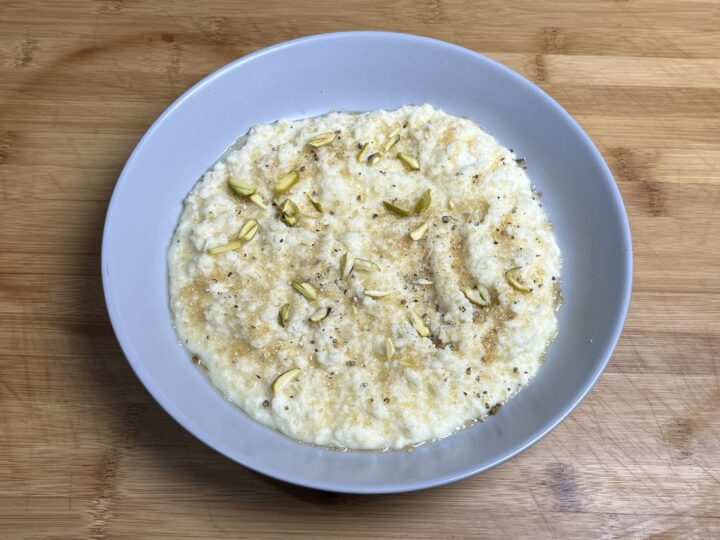
Kalakand is a simple yet delightful, sweet that's perfect for any holiday celebration or festive occasion. Known for its moist and grainy texture, this milk-based dessert is delicately flavored with cardamom, making it irresistible.Traditionally, Kalakand is made with just three ingredients—milk, sugar, and cardamom. While most Indian sweets, such as burfi, have a fudge-like consistency, Kalakand stands out with its moistness. Although it doesn't typically require garnishing, I decided to add pistachios for a touch of color and presentation. I also used ricotta cheese to make it simple and the results were just as delicious.Kalakand is a must-try treat, whether you're celebrating a festival or simply want to enjoy something sweet!
Boil the milk over low to medium heat. Before adding the milk, wet the pan with water to prevent it from sticking to the surface.
Boil the milk for about fifteen minutes, allowing it to reduce to almost half its original quantity. Stir the milk occasionally and scrape the sides to prevent the milk from sticking and browning.
Add the ricotta cheese and sugar mix well. Keep stirring and scraping the sides of the pan until the mixture is very soft but it has come together, I do not want to cut them into pieces. Then, add the cardamom powder and mix it in before turning off the heat.
As the Kalakand cools to room temperature, it will thicken slightly. I prefer to keep it soft so that it can be served with a spoon, similar to thick yogurt. Kalakand should be moist and have a grainy texture.
Before serving, garnish with crystal sugar, crushed cardamom, and, if desired, sliced pistachios. I used slightly less sugar in the Kalakand, and sprinkling crystal sugar adds a pleasant mild crunch, while the crushed cardamom enhances the flavor.
Kalakand is a beloved Indian sweet that is often enjoyed during festivals, special occasions, or anytime you want to indulge in something rich and satisfying. Known for its moist and grainy texture, this milk-based dessert is delicately flavored with cardamom and garnished with pistachios for a touch of elegance. Unlike other Indian sweets such as burfi, which have a fudge-like consistency, Kalakand stands out because of its soft, creamy texture. This delightful sweet is easy to make and irresistibly delicious, making it a perfect addition to your festive celebrations.
Cultural and Traditional Importance
Kalakand holds a special place in Indian households during festivals like Diwali, Holi, and Raksha Bandhan. It is one of those sweets that brings a sense of joy and celebration. Traditionally, Kalakand is made with just a few simple ingredients—milk, sugar, and cardamom—but its slow-cooking process brings out rich flavors that make it unique. In many Indian homes, making Kalakand is not only about the sweet itself, but also about the shared moments of celebration with family and friends.
Though Kalakand doesn’t require garnishing, I like to add sliced pistachios for a burst of color and texture, enhancing both its presentation and taste. It’s a treat that brings back nostalgic memories of festive occasions, and now, with this simplified version using ricotta cheese, you can enjoy it with minimal effort.
Recipe Variations from Manjula’s Kitchen
While Kalakand is a delightful dessert on its own, you can explore other similar milk-based sweets from Manjula’s Kitchen that offer unique flavors and textures:
Burfi: A classic fudge-like sweet made with condensed milk and nuts like cashews or almonds.
Rasgulla: A spongy, syrup-soaked dessert made from paneer, offering a light and juicy contrast to Kalakand.
Rasmalai: Soft paneer dumplings soaked in sweetened, flavored milk, with cardamom and saffron.
Peda: A simple and elegant sweet made from condensed milk and flavored with cardamom.
Health Benefits and Dietary Considerations
Kalakand is a rich, indulgent dessert, but it also offers some nutritional benefits due to its milk base. Full-fat milk is a good source of calcium, protein, and essential vitamins. Using ricotta cheese in this recipe simplifies the cooking process while keeping the dessert creamy and delicious. If you’re looking for a lighter version, you can reduce the sugar or substitute it with a natural sweetener like honey.
This version of Kalakand is naturally gluten-free, making it suitable for those with gluten sensitivities. For a vegan alternative, you can experiment with plant-based milks and vegan ricotta, though it may slightly alter the texture.
Serving Suggestions
Kalakand is best served at room temperature, allowing its soft, grainy texture to shine. Garnish it with crushed cardamom, crystal sugar, and sliced pistachios for added flavor and visual appeal. This sweet treat can be enjoyed on its own or as part of a larger dessert spread during festivals or family gatherings.
For a more complete festive meal, consider serving Kalakand alongside other Indian sweets like Gulab Jamun or Jalebi to create a dessert platter that showcases a variety of textures and flavors.
ConclusionKalakand is a simple yet irresistible sweet that’s perfect for celebrating any special occasion. Its creamy, moist texture combined with the subtle flavor of cardamom makes it a dessert that everyone will love. With this easy-to-follow recipe using ricotta cheese, you can recreate the traditional taste of Kalakand in less time, making it an ideal treat for festivals, parties, or even as a special indulgence after dinner. Try this recipe today and enjoy the rich flavors of Kalakand with your loved ones.
Frequently Asked Questions (FAQs)
What is Kalakand made of?
Traditionally, Kalakand is made with milk, sugar, and cardamom. In this simplified version, ricotta cheese is used to reduce the cooking time while maintaining the rich texture.
How is Kalakand different from Burfi?
Kalakand has a moist and grainy texture, while Burfi is firmer and more fudge-like. Both are milk-based sweets, but Kalakand is known for its soft, melt-in-your-mouth consistency.
Can I make Kalakand vegan?
While this recipe uses full-fat milk and ricotta cheese, you can experiment with plant-based milks and vegan ricotta to make a vegan version. However, the texture may differ slightly.
What are some similar desserts to Kalakand?
Similar milk-based sweets include Burfi, Rasgulla, Rasmalai, and Peda.
How should I serve Kalakand?
Serve Kalakand at room temperature, garnished with crystal sugar, crushed cardamom, and pistachios for added flavor and texture.
Aloo Bhindi is a popular dish in my home, a simple yet flavorful North Indian stir-fry made with potatoes (aloo) and okra (bhindi). This vegan and gluten-free dish is spiced just right, making it a crowd-pleaser for everyone at the table.I always find that home-cooked meals are more flavorful, fresh, and nourishing, and this Aloo Bhindi is no exception. It’s quick to prepare, using everyday ingredients, and the balance of spices brings out the natural flavors of the vegetables. Adding tomatoes at the end not only enhances the taste but also makes the dish vibrant and visually appealing.I always find that home-cooked meals are more flavorful, fresh, and nourishing, and this Aloo Bhindi is no exception. I like to serve Aloo Bhindi with dal, rice, and roti, creating a balanced and enjoyable meal.
Wash the okra thoroughly and ensure it is completely dry. Cut the okra into ½ inch rounds.
Boil the potatoes, ensuring they are not overcooked. Peel them and cut them into pieces about twice the size of the okra.
Chop the tomatoes into pieces about the same size as the potatoes.
Heat 1 tablespoon of oil in a saucepan over low heat. Add the okra and stir-fry for about 5 minutes, until tender but still green. Remove the okra from the pan and set aside.
In the same pan, add 1 tablespoon of oil. Heat the oil until moderately hot and test the heat by adding a single cumin seed. If the seed cracks right away, the oil is ready. Add cumin seeds, mustard seeds, and asafetida. Stir, then add the potatoes and ginger, stirring for 2-3 minutes.
Stir in the spices: coriander powder, turmeric, and chili powder. Add the okra back into the pan, sprinkle with besan (gram flour) and salt. The besan helps the spices coat the okra and potatoes. Cook for 2-3 minutes over low heat.
Once the okra and potatoes are cooked through, add the chopped tomatoes and stir for a few more minutes until combined. Adding tomatoes at the end not only enhances the taste but also makes the dish vibrant and visually appealing. The Potato Okra Masala is ready and looks vibrant and colorful.
Aloo Bhindi Masala (Potato Okra): A Flavorful North Indian Stir-Fry | Manjula’s Kitchen
Introduction to Aloo Bhindi Masala
Aloo Bhindi, a delicious combination of potatoes (aloo) and okra (bhindi), is a beloved North Indian stir-fry that’s both vegan and gluten-free. This dish is spiced to perfection, with everyday ingredients that enhance the natural flavors of the vegetables. It’s a simple, quick, and nutritious meal that’s perfect for any day of the week. With tender okra, perfectly boiled potatoes, and a blend of spices, Aloo Bhindi makes a great accompaniment to dal, rice, or roti.
Cultural and Traditional Importance
Aloo Bhindi is a common dish in many North Indian households. Its simplicity and ease of preparation make it a staple for busy weeknights, while its flavorful spices and colorful presentation make it special enough for family gatherings. In India, meals often feature a variety of dishes to balance textures and flavors, and Aloo Bhindi is frequently paired with lentils like Dal Tadka and breads like Roti for a wholesome and complete meal.
Cooking Aloo Bhindi at home not only allows for fresher ingredients but also ensures that the dish is prepared exactly to your taste. With the addition of besan (gram flour) and tomatoes, this dish becomes both hearty and vibrant, appealing to everyone at the table.
Recipe Variations from Manjula’s Kitchen
While Aloo Bhindi Masala is a popular dish on its own, you can explore other similar stir-fry recipes or variations with different vegetables from Manjula’s Kitchen:
Aloo Gobi: A stir-fry made with potatoes and cauliflower, flavored with similar spices, making it a close cousin to Aloo Bhindi.
Bhindi Masala: A more saucy version of okra, cooked in a spiced tomato gravy, offering a different take on okra dishes.
Aloo Baingan: A tasty variation that combines potatoes with eggplant, cooked in a similar blend of spices.
Baingan Bharta: A roasted eggplant dish that pairs well with Aloo Bhindi as part of a larger spread.
Health Benefits and Dietary Considerations
Aloo Bhindi is not only flavorful but also packed with nutrients. Okra is rich in vitamins A and C, fiber, and antioxidants, while potatoes provide potassium and carbohydrates, making this dish a great source of energy. The use of minimal oil and the addition of spices like cumin, coriander, and turmeric add both flavor and health benefits, with turmeric known for its anti-inflammatory properties.
This recipe is naturally gluten-free and vegan, making it suitable for a variety of dietary needs. For a lower-carb option, you can reduce the amount of potatoes or substitute them with sweet potatoes or other root vegetables. Besan (gram flour) adds a touch of protein and helps the spices adhere to the vegetables, making the dish even more satisfying.
Serving Suggestions
Masala Aloo Bhindi can be enjoyed as a side dish or as the main course. It pairs perfectly with Indian breads like roti, paratha, or even naan. For a more complete meal, serve it alongside Jeera Rice and a cooling yogurt dish like Raita.
If you’re hosting a meal, Aloo Bhindi Masala makes a colorful addition to the table when paired with other Indian classics like Chole or Dal Fry. The vibrant colors and bold flavors of these dishes create a well-balanced and satisfying meal that’s sure to impress.
Conclusion
Aloo BhindiMasala is a simple, flavorful, and nutritious dish that can be prepared quickly with everyday ingredients. Its combination of tender potatoes, crisp okra, and aromatic spices makes it a versatile meal option that’s both comforting and satisfying. Whether you’re serving it as part of a traditional Indian meal or enjoying it as a standalone dish, Aloo Bhindi is sure to become a favorite in your home. Try this recipe today and bring the taste of North Indian home cooking to your kitchen.
Frequently Asked Questions (FAQs)
How can I prevent okra from becoming slimy?
To prevent sliminess, make sure the okra is thoroughly dry before cooking. Frying the okra over low heat without covering the pan also helps to keep the texture crisp.
Can I substitute potatoes with another vegetable in this recipe?
Yes, you can substitute potatoes with sweet potatoes, carrots, or even eggplant for a different take on the dish.
What are some variations of Aloo Bhindi I can try?
You can try Aloo Gobi or Bhindi Masala for similar stir-fried dishes that use different vegetables or a saucy variation.
How should I serve Aloo Bhindi?
Masala Aloo Bhindi pairs wonderfully with roti, paratha, or naan. It can also be served with rice and a cooling raita for a complete meal.
Is this dish suitable for vegans and those on a gluten-free diet?
Yes, Aloo Bhindi is naturally vegan and gluten-free, making it a great choice for those with dietary restrictions.
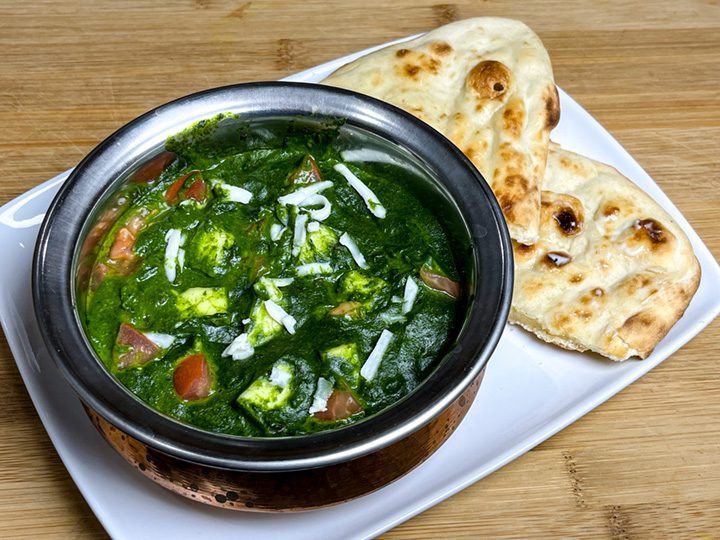
Palak Paneer is perhaps the most popular paneer dish in North India and is a favorite in Indian restaurants. Creamy spinach paired with paneer makes for a delicious main course. This recipe has always been one of my favorites, and I can prepare it quickly. Although I’ve made this recipe before, I now want to simplify it by using just a few ingredients. Even after so many years of cooking, I’m still learning and striving to keep things simple, healthy, nutritious, and flavorful. This dish is made with blanched spinach, which helps retain its vibrant green color. I didn’t know why blanching was used in cooking, but this is all part of the learning process. Palak Paneer pairs perfectly with roti, naan, or paratha.
5 ozspinach washed and clean, about 6 cups packed spinach
1cuppaneer cubed into bite size, about 4oz of paneer
1green chili chopped
1tbsp oil
1/2tsp cumin seeds – jeera
1/8tspasafetida – hing
1tsp coriander powder – dhania
1/4tspturmeric – haldi
1/2tsp salt adjust to taste
1/2tsp sugar
1tbsp whole wheat flour
1/4cup heavy cream
1/4cup finely chopped tomato
2tbsp paneer shredded for garnishing
Instructions
First blanch the spinach, this helps to keep the spinach color bright. To blanch the spinach, boil about 6 cups of water in a saucepan, and let the spinach boil for one minute. Drain the water and put the spinach in ice cold water for about two minutes. Drain the water.
Blend the spinach, ginger and green chili. Spinach should be creamy.
Soak the cubed paneer in about three cups of hot water, for about 5 minutes. This helps to give the paneer a soft texture. Set it aside.
While cooking, spinach can splatter, use larger saucepan. Heat the oil in a saucepan, over medium high heat. Test the heat by adding one cumin seed to the oil; if it cracks right away it is ready.
Add cumin seed, and asafetida. After cumin seeds crack, add blended spinach and stir. Add coriander, salt, and sugar, stir.
After spinach comes to boil lower the heat to low, and let the spinach cook for about 5-6 minutes partially cover the pot, because spinach will splatter. I don’t cover the pan fully because this helps keep the green color of spinach.
Mix the flour to 1/2 cup of water and add to the spinach, also add the cream. Mix it well and let it cook for five minutes. If needed add a little more water.
Drain the paneer and fold it gently with spinach and let it simmer for about five minutes.
Palak paneer is ready, add the tomatoes and turn off the heat. Garnish it with shredded or crumbled paneer.
Palak Paneer is one of the most popular paneer dishes from North India and a favorite at Indian restaurants around the world. This creamy, flavorful dish features tender paneer cubes nestled in a rich spinach sauce, making it a perfect main course for any meal.
With its vibrant green color and delicious combination of spinach and paneer, Palak Paneer pairs wonderfully with roti, naan, or paratha. This simplified version of the recipe uses just a few ingredients, allowing the natural flavors of the spinach and paneer to shine while remaining healthy and nutritious.
Cultural and Traditional Importance
Paneer dishes are a staple in North Indian cuisine, and Palak Paneer is undoubtedly one of the most beloved. Traditionally prepared in Indian households and served during special occasions or family gatherings, this dish showcases the versatility of paneer and the use of leafy greens in Indian cooking.
Palak Paneer is often served with flatbreads like naan or paratha, and its creamy texture and mildly spiced flavor make it a crowd-pleaser.
This simplified recipe doesn’t compromise on taste, while offering a more convenient way to prepare Palak Paneer at home. Blanching the spinach helps retain its bright green color, making the dish visually appealing as well as delicious.
Recipe Variations from Manjula’s Kitchen While Palak Paneer is a classic dish on its own, you can explore other paneer-based recipes and spinach variations from Manjula’s Kitchen:
Paneer Butter Masala: A rich and creamy tomato-based dish, perfect for those who enjoy a sweeter, milder flavor.
Aloo Palak (Potato Spinach): A delicious vegetarian dish combining spinach with tender potatoes, offering another way to enjoy spinach in your meals.
Paneer Saag: A similar dish that incorporates other leafy greens, like mustard greens, along with spinach for a different flavor profile.
Matar Paneer: A flavorful combination of paneer and green peas cooked in a spiced tomato sauce, offering a wonderful variation for paneer lovers.
Health Benefits and Dietary ConsiderationsPalak Paneer is not only delicious but also packed with nutrients. Spinach is rich in iron, vitamins A, C, and K, as well as antioxidants that promote overall health.
The use of paneer adds a good amount of protein and calcium, making this dish a balanced meal that supports both muscle and bone health.
For those looking to make a lighter version of Palak Paneer, you can substitute the heavy cream with a lighter cream or yogurt. The dish is also naturally gluten-free (ensure the flour you use is gluten-free or omit it), making it suitable for those with gluten sensitivities. If you’re vegan, tofu can be used in place of paneer to create a delicious Palak Tofu.
Serving SuggestionsPalak Paneer can be served with a variety of Indian breads, such as roti, naan, or paratha. It also pairs well with rice dishes like Jeera Rice or Plain Basmati Rice for a more complete meal. For added texture and flavor, you can garnish the dish with freshly grated paneer or a drizzle of cream.
For a more elaborate meal, serve Palak Paneer alongside other classic Indian dishes such as Dal Tadka or Aloo Gobi to create a balanced vegetarian spread.
ConclusionPalak Paneer is a quintessential North Indian dish that brings together the creamy richness of paneer and the nutritious goodness of spinach. This simplified recipe ensures that you can prepare this dish quickly, without sacrificing flavor or texture. Whether you’re cooking for a family dinner or hosting a special meal, Palak Paneer is sure to be a hit. Try this recipe today and enjoy one of India’s most loved dishes in the comfort of your home.
Frequently Asked Questions (FAQs)
How do I keep the spinach color bright in Palak Paneer?
Blanching the spinach is the key to retaining its vibrant green color. Boil the spinach for about a minute, then immediately transfer it to ice-cold water to stop the cooking process.
Can I make Palak Paneer vegan?
Yes, you can substitute the paneer with tofu and use coconut cream or cashew cream in place of dairy cream to make a vegan version of this dish.
What are some variations of Palak Paneer I can try?
You can try dishes like Saag Paneer, which uses a combination of leafy greens, or Aloo Palak, which pairs spinach with potatoes for a different take on the classic.
How do I serve Palak Paneer?
Palak Paneer pairs wonderfully with Indian breads like naan, roti, or paratha. It can also be served with Jeera Rice or Plain Basmati Rice.
Can I prepare Palak Paneer in advance?
Yes, you can prepare the spinach puree and paneer in advance. Store them separately in the refrigerator, and when ready to serve, gently reheat and combine the two for a fresh and delicious meal.
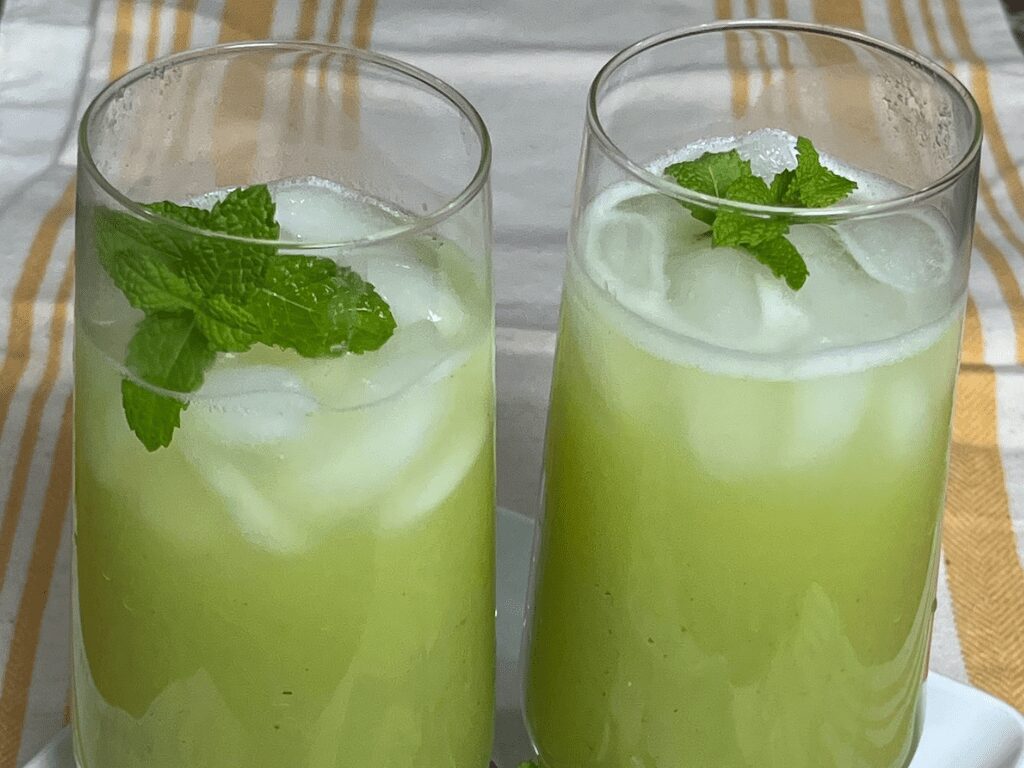
Summer is here, and it's getting warm—just the right time to try making different summer drinks. The Pineapple Cucumber Cooler is a delicious and refreshing treat. I like to add a hint of lemon, ginger, and mint to most of my fruit drinks, which gives them a nice kick. It's perfect for quenching your thirst on hot summer days.For this drink, you can use fresh pineapple, but I used canned pineapple to make it easier. Most of the time, I have the ingredients on hand, and there’s not much prep work. I love how easy it is to combine everything in the blender.I definitely plan on making this refreshing Pineapple Cucumber Cooler throughout the rest of the summer.
Add the pineapple, cucumber, lemon juice, ginger, mint leaves, salt and sugar to a blender.
Pour in 1 cup of cold water. Blend until smooth.
Strain the mixture through a fine mesh sieve.
Serve over ice and garnish with additional mint leaves.
Enjoy your refreshing drink all summer long!
Notes
Tips:Instead of water, use coconut water or sparkling water for a different twist.These drinks are easy to prepare, and you can use whatever fruits you have available or your favorite fruits.Blend the mixture without adding water and freeze it in ice cube trays for a refreshing twist.
Summer is here, and with the rising temperatures, there’s nothing better than a cool and refreshing drink to quench your thirst. The Pineapple Cucumber Cooler is a perfect summer recipes, combining the sweetness of pineapple with the refreshing taste of cucumber. The addition of lemon, ginger, and mint gives it an extra zing that will leave you feeling revitalized.
This drink is incredibly easy recipe to make and requires minimal prep time. Whether you’re hosting a summer party or just relaxing at home, this cooler is sure to be a hit.
Why You’ll Love This Pineapple Cucumber Cooler
Refreshing and Hydrating: The combination of pineapple and cucumber makes this drink incredibly hydrating, perfect for hot summer days.
Quick and Easy: With just a few ingredients and a blender, you can whip up this cooler in minutes.
Healthy and Natural: Made with fresh ingredients and minimal sugar, it’s a healthier alternative to sugary sodas and store-bought drinks.
Versatile: You can easily customize the recipe with different fruits or by using coconut water or sparkling water for a twist.
How to Make Pineapple Cucumber Cooler
This Pineapple Cucumber Cooler recipe is simple and quick to prepare. Here’s how you can make it:
Ingredients:
1 20 oz can crushed pineapple
1 large cucumber, peeled and chopped
2 tablespoons lemon juice
1 teaspoon fresh ginger, peeled and chopped
A handful of fresh mint leaves
1 tablespoon sugar (adjust to taste)
Pinch of salt
1 cup cold water
Instructions:
Blend the Ingredients: In a blender, combine the crushed pineapple, chopped cucumber, lemon juice, ginger, mint leaves, sugar, and salt. Add 1 cup of cold water.
Strain the Mixture: Blend the mixture until smooth, then strain it through a fine mesh sieve to remove any pulp.
Serve and Garnish: Pour the cooler over ice and garnish with additional mint leaves for an extra touch of freshness.
Enjoy: Sip and enjoy your refreshing drink all summer long!
Tips for the Perfect Cooler
Switch Up the Base: For a different twist, try using coconut water or sparkling water instead of regular water. This adds a new layer of flavor and hydration.
Make It Ahead: Blend the mixture without adding water and freeze it in ice cube trays. When you’re ready for a drink, just blend the cubes with some water for an instant cooler.
Customize with Fruits: Feel free to experiment with other fruits you have on hand. Watermelon, berries, or even mango can be great additions.
Other Variants of Summer Beverages:
Exploring Manjula’s Kitchen reveals a treasure trove of other delicious recipes that you might enjoy.
Fruit Smoothie: This Fruit smoothie is a delicious and healthy drink, and also quick and easy to make. This great smoothie consists of cantaloupes, strawberries, and yogurt with a touch of ginger giving a nice and tangy taste.
Badam Milk: Almond saffron milk is a festive drink; this can be served hot or cold. Milk with a blend of nuts and flavored with saffron to give a beautiful orange-yellow color and distinctive flavor and aroma.
Cold Coffee: To help beat the heat on a hot summer day, there’s nothing like a tall glass of cold coffee.
Mango Lassi: Mango Lassi is a soothing cold drink for hot summer days or to brighten up any meal. This pale drink is a blend of mango and yogurt.
FAQs
How to Make Pineapple Cucumber Cooler?
To make Pineapple Cucumber Cooler, blend together pineapple, cucumber, lemon juice, ginger, mint leaves, sugar, and salt with cold water. Strain the mixture and serve over ice.
Can I Use Fresh Pineapple Instead of Canned?
Yes, you can use fresh pineapple if you prefer. Just make sure to peel and core it before blending.
Is Pineapple Cucumber Cooler Healthy?
Yes, this cooler is a healthy and refreshing drink made with natural ingredients. It’s hydrating, low in sugar, and full of vitamins and antioxidants from the pineapple, cucumber, and mint.
Can I Make This Cooler Ahead of Time?
You can prepare the cooler ahead of time and store it in the refrigerator for up to 24 hours. Just give it a good stir before serving.
What Other Ingredients Can I Add to This Cooler?
Feel free to customize your cooler with other fruits like watermelon, berries, or mango. You can also add a splash of coconut water or sparkling water for extra flavor.